
Have you ever encountered a G chord that resonates brightly and comfortably, then transitioned to G7, only to find it sounds a bit more…anticipatory? As if it is leaning forward, awaiting the next chord to follow. That sense of “unsettledness” is precisely the intention behind it.
G7 is classified as a dominant seventh chord constructed from the notes G (Root), B (Major 3rd), D (Perfect 5th), and F (Minor 7th). Mastering this chord grants you access to a wealth of classic tension and resolution transitions (consider the progression of V7 to I). Additionally, it is prevalent across various genres including blues, jazz, funk, and traditional rock music.
This article will examine the open chord shape, a one-finger shortcut, a compact triad located higher up the fretboard, barre variations, and practice drills for smoother transitions.
First Steps: Playing the G7 Chord
Place your middle finger on the 2nd fret of the A string (5th string).
Place your index finger on the 1st fret of the high E string (1st string).
Place your ring finger on the 3rd fret of the E string (6th string).
Check Your Strings:
Strum all the strings, but make sure the D (4th string) and G (3rd string) strings are played open.
Strum from the low E string down to the high E string.
Make sure each note sounds clear and distinct.
If a note sounds muted or muffled, adjust the position of your fingers.
Keep your fingers wrapped around the neck for better support.
Play with Songs:
Try playing along with songs that use the G7 chord to get familiar with it within a musical context.
Music Theory Snapshot: The “Magic” Note

The addition of one note transforms the standard G major chord into something that exudes a sense of thirst for resolve. That slight tension is what allows G7 to convey an urgent desire to connect to the following chord.
The Formula
Below is a straightforward comparison of the two chord types, which you can hear as soon as you strum them.
- G Major: G – B – D
- G7: G – B – D – F (The flattened 7th)
The Interval Breakdown
By identifying the notes based on their roles within the chord, it becomes easier to recall what you’re experiencing audibly.
- 1 (Root): G
- 3 (Major Third): B
- 5 (Perfect Fifth): D
- b7 (Minor Seventh): F
The G7 chord carries a distinctive “rub” quality, largely stemming from the dynamic interplay between two notes within the chord that push against one another, then release their tension when transitioning to another chord.
The tension arises from the interaction of the notes B and F within the chord. When you then move to C Major, that tension resolves cleanly, culminating in a satisfying musical experience. This explains why the movement from G7 to C feels akin to posing a question that eventually receives an answer.
Step by Step: How to Play the G7 Chord
The G7 chord is one of those musical elements you can learn in a matter of minutes yet continue improving upon for years. Below are three practical shapes, ranging from a full-sounding open chord to a quicker and simpler variant, alongside a tight option positioned higher on the fretboard.
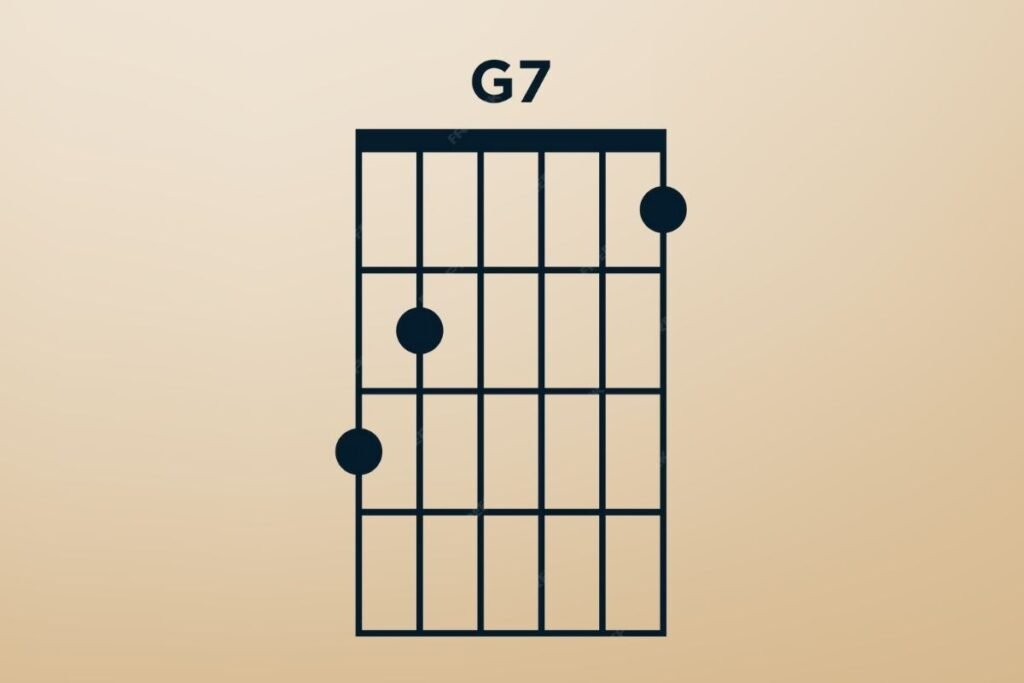
Method 1: The Standard Open G7
This is a widely used open G7 position and is typically the first version that many guitarists learn. It produces a clear, resonant sound suitable for a diverse range of musical styles, from blues to classic pop.
FINGERING
1st finger: 1st fret on the high E string
2nd finger: 2nd fret on the A string
3rd finger: 3rd fret on the low E string
All other strings played open.
- Finger Placement:
- Ring Finger: 3rd Fret, Low E String (6th string).
- Middle Finger: 2nd Fret, A String (5th string).
- Index Finger: 1st Fret, High E String (1st string).
- Strumming: Strum all six strings for a full sound.
It is advisable to maintain a high arch in your fingers (as if holding an apple) to prevent unintentionally muting the open D, G, and B strings while playing.
Method 2: The “Super Easy” 1-Finger G7
If the traditional full grip currently feels cumbersome, this shortcut offers a simplified way to produce the G7 sound without straining your hand.
FINGERING
Index Finger: 1st fret on the high E string
All other played strings are open.
STRUMMING
Strum only the top 4 strings (D, G, B, E). Avoid hitting the low E and A strings.
- Finger Placement:
- Index Finger: 1st Fret, High E String.
- Strumming: Strum only the top four strings (D, G, B, E) either in an upward or downward direction.
It is essential to avoid strumming the thicker Low E and A strings to maintain clarity of sound. This method is particularly beneficial for absolute beginners and works well for straightforward folk strumming patterns.
Method 3: The 4th Position Triad
This chord shape is positioned higher on the fretboard and produces a sharper sound, which can be likened to a short “hit” chord. It is highly effective when you want the G7 chord to stand out without dominating the lower frequencies.
FINGERING
Index Finger: 4th fret on the G string
Middle Finger: 5th fret on the D string
Pinky Finger: 6th fret on the B string
Strum only the middle 3 strings.
TONE CHARACTER
This higher position produces a sharper, brighter sound perfect for percussive “hit” chords that cut through without dominating low frequencies.
- Finger Placement:
- Index Finger: 4th Fret, G String (3rd string).
- Middle Finger: 5th Fret, D String (4th string).
- Pinky Finger: 6th Fret, B String (2nd string).
- Strumming: Strum from the D string downwards, focusing on only four strings.
- Why use it: This voicing is punchy and high-pitched, making it especially well-suited for styles like funk, reggae, or as a secondary guitar part.
G7 Barre Chord Variations
Once you become adept at cleanly performing barre chords, the G7 evolves from being merely an open chord to a versatile and movable tool. The following two shapes exemplify the breadth of this versatility: one is larger and more pronounced, while the other is more compact and smoother.
Variation 1: Root 6 G7 Barre Chord (E7 Shape)
This barre chord resembles an E7 shape moved further up the neck. It delivers a robust and assertive sound, particularly effective when amplified.
- Position: Barre across the 3rd fret using your index finger.
- Shape: Incorporate your ring finger on the 5th fret of the A string and your middle finger on the 4th fret of the G string.
- Use Case: Ideal for rock and blues power chord playing.
Variation 2: Root 5 G7 Barre Chord (A7 Shape)
This version is positioned higher up and is particularly well-suited for cleaner musical styles. It circumvents some of the low-end boom that may arise from root 6 shapes.
FINGERING
Index Finger: Barre from A string to B string at 10th fret
Middle Finger: 11th fret on the G string
Pinky Finger: 12th fret on the high E string
Don’t play the low E string.
USE CASE
Ideal for jazz and neo-soul contexts. Higher position produces a cleaner sound, avoiding low-end boom from root 6 shapes.
- Position: Barre across the 10th fret, starting from the A string down.
- Shape: Include the note on the 12th fret of the High E string (or utilize the standard A7 shape).
- Use Case: Applicable in jazz and neo-soul contexts.
Transitions and Playing Hacks
While learning the G7 chord is straightforward, the art lies in transitioning smoothly within the context of a song. Implementing these minor techniques can significantly reduce hand movement and enable a cleaner sound right from the outset.
The “Pinky Lift” (G Major to G7)
If you typically play a G Major chord using a four-finger folk style, you can effortlessly slide into G7 with minimal adjustment.
- If your G Major uses the four-finger shape (with the pinky on the High E string and the ring on the B string), simply lift your pinky off the High E string and position your index finger on the 1st fret of the High E string. This maintains your hand’s position and minimizes movement compared to having to reform the entire chord.
Muting the A String
At times, a G7 chord may sound more appealing when it is played tighter, particularly if you are strumming energetically or using distortion effects.
- To achieve this, lightly let the flesh of your ring finger (located on the Low E string) touch the A string in order to mute it.
- This technique results in a tighter, punchier sound that highlights the root and the minor seventh, eliminating the low harmony. It works exceptionally well in rock rhythm sections.
Transition Drill: The C to G7 Pivot
This transition drill seems simple but is incredibly useful since it appears frequently in numerous songs.
- Both chords share a similar diagonal configuration that makes switching easier.
- Practice moving between C and G7 for one minute without interruption. Concentrate on keeping your movements streamlined; your hand should expand when transitioning to G7 and contract when going back to C.
Practice Routine and Troubleshooting

Achieving a clean G7 sound depends on consistent small practices. Use the following brief checks to cultivate the chord shape more quickly, keep your hands relaxed, and address buzzing before it becomes a lasting problem.
Chord On Off Drill
This is a straightforward reset exercise designed to train your hand to readily find G7 when needed, rather than merely holding it after you’ve established the chord.
Press the G7 shape –> Strum –> Remove your hand completely from the neck –> Shake it out –> Repeat. This method fosters muscle memory more effectively than just holding down the chord continuously.
Thumb Placement
If you encounter cramped fingers or inadvertently mute strings, your thumb placement is often the culprit, even if it does not initially feel this way.
Ensure that your thumb is positioned centrally on the back of the neck (not curled over), granting your fingers optimal reach and arch while forming the chord.
Clean Up the Buzz
Buzzing typically indicates that your finger is landing in an incorrect area, rather than necessitating a harder press.
If you experience buzzing, try pressing closer to the fret wire (without pressing too hard on top of it, or too far back).
Famous Songs Using G7
If you wish to make the G7 chord feel instinctive, incorporate it into real music. The following songs showcase that tense sound fulfilling its role before seamlessly transitioning to the next chord.
- “Hound Dog” (Elvis Presley): A quintessential 12-bar blues piece where G7 functions as the turnaround chord.
- “Sweet Home Chicago” (Blues Standard): Fundamental for the driving blues shuffle rhythm.
- “Love Me Do” (The Beatles): Utilizes G7 to create the central hook prior to resolving to C.
- “Stand By Me” (Ben E. King): The G7 chord marks the conclusion of the verse and the introduction of the chorus.


